

Tutor LMS ships with the basics name, email, password but most schools and course creators need more: phone numbers, company names, qualifications, country, and so on.
With Custom User Registration Fields for Tutor LMS, you can add those fields from the WordPress admin, no code, no theme overrides. Fields show up on student and instructor registration forms, and saved values appear in the Tutor dashboard, Tutor admin backend, and WordPress user profiles automatically.
In this tutorial you will learn how to:
- Install and open the plugin settings
- Add a Phone Number field to the student registration form
- Add the same (or different) fields to the instructor registration form
- Confirm where users and admins can view and edit the data
- Optionally read field values in custom templates (for developers)
The same steps work for any supported field type.
What You Need
- WordPress 6.0 or later
- PHP 7.4 or later
- Tutor LMS installed and active (free or Pro)
- Custom User Registration Fields for Tutor LMS
Supported Field Types
Each field can be one of:
| Type | Best for |
|---|---|
| Text | General short answers |
| Phone | Phone numbers (tel input) |
| Secondary email addresses | |
| Number | Age, years of experience, etc. |
| URL / Website | Portfolio or company site |
| Date | Birth date, start date |
| Textarea | Longer free-text answers |
| Select / Dropdown | Fixed choices you define |
You can also mark fields as Required, set Placeholder text, and for dropdowns define Options (one per line).
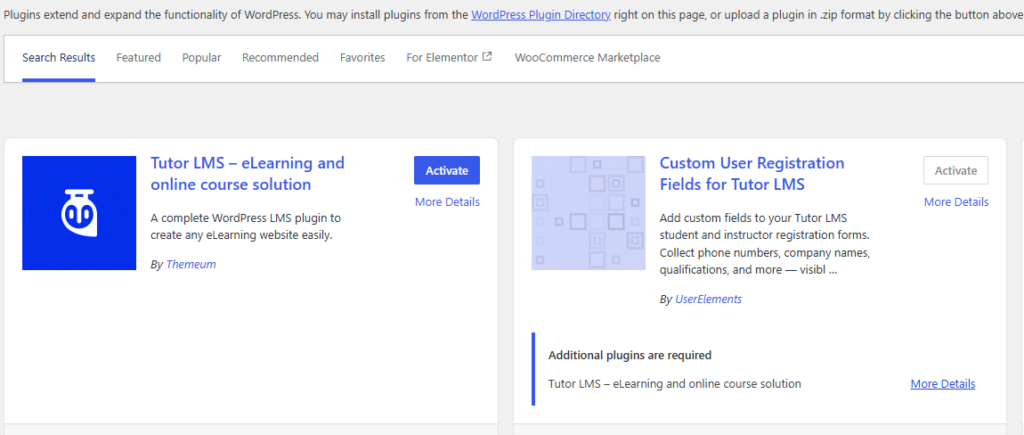
Step 1: Install the Plugin
- In WordPress, go to Plugins → Add New Plugin.
- Search for Custom User Registration Fields for Tutor LMS.
- Click Install Now, then Activate.
Step 2: Open Registration Fields Settings
- In the admin sidebar, go to Tutor LMS → Registration Fields.
- You will see two tabs:
- Student Registration Fields
- Instructor Registration Fields
Each tab has its own field list and Save Fields button. Student and instructor forms are configured independently.

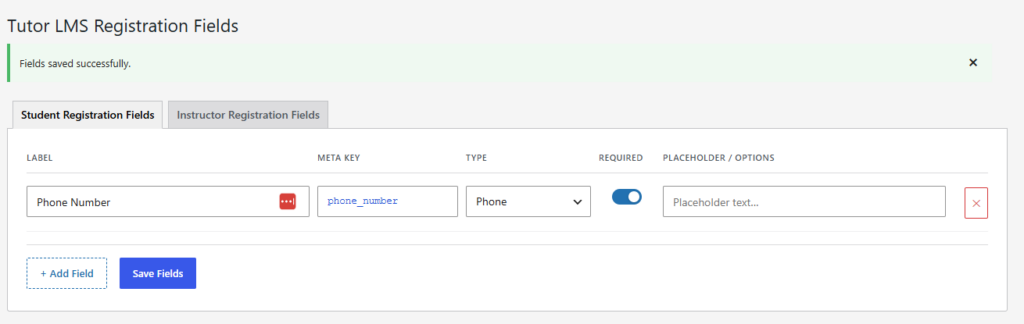
Step 3: Add a Phone Number Field (Student Form)
Stay on the Student Registration Fields tab.
- Click + Add Field if no empty row is shown.
- Fill in the row:SettingExample valueLabel
Phone NumberMeta Keyphone_numberTypePhoneRequiredOn (optional)Placeholdere.g. +1 555 123 4567 - Click Save Fields.
Meta key rules: lowercase letters, numbers, and underscores only (e.g. phone_number, not Phone Number). The meta key is how the value is stored in WordPress user meta.
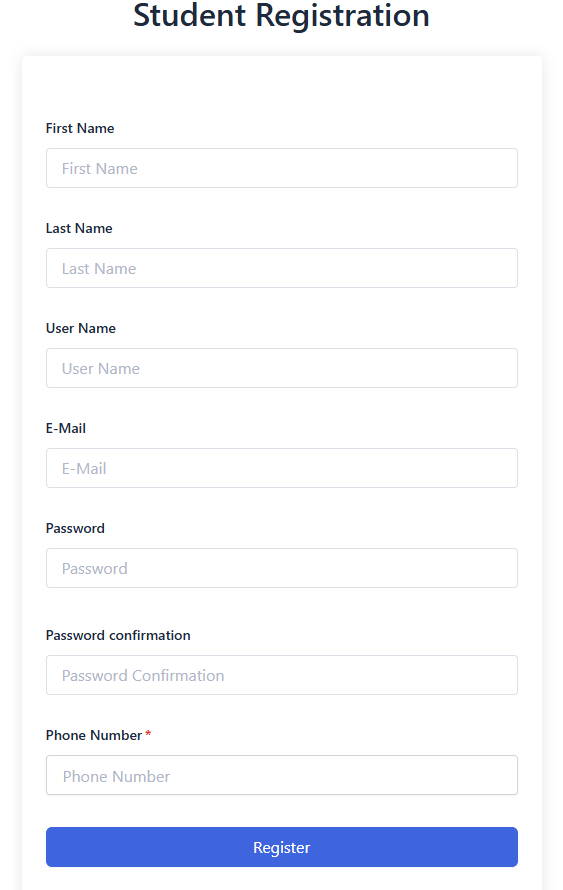
Step 4: Check the Student Registration Form
Open your site’s student registration page (the page Tutor LMS uses for student sign-up). The Phone Number field should appear below Tutor’s default fields, styled to match the form.
If you do not see it:
- Confirm you clicked Save Fields on the Student tab (not Instructor).
- Confirm Tutor LMS is using the correct registration page (see Troubleshooting below).
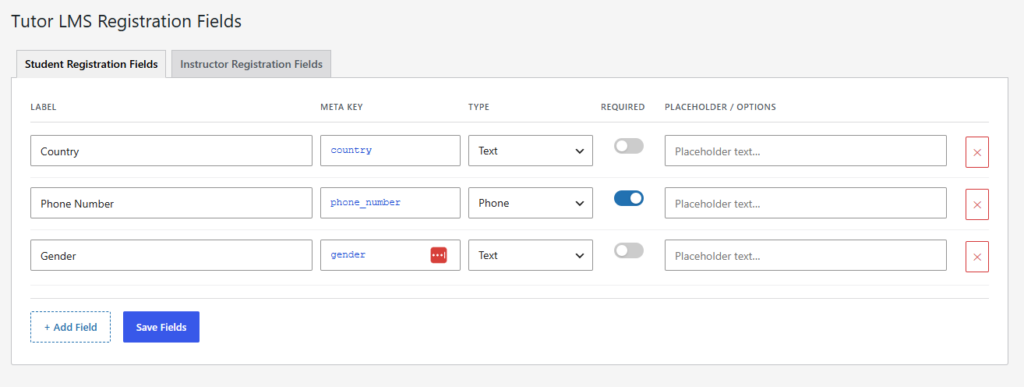
Step 5: Add a Field to the Instructor Registration Form
- Go back to Tutor LMS → Registration Fields.
- Open the Instructor Registration Fields tab.
- Add your fields—for example:LabelMeta KeyTypePhone Number
phone_numberPhoneTeaching Experienceteaching_experienceTextareaSubject Areasubject_areaSelectFor Select fields, choose type Select / Dropdown, then enter options in the Options — one per line box, e.g.:MathematicsScienceLanguagesBusiness - Click Save Fields.
Step 6: Where Saved Data Appears (No Theme Editing Required)
Unlike older workflows, you do not need to copy my-profile.php into your theme. The plugin handles display and saving in these places:
For students and instructors (frontend)
After registration, users can view and update their custom fields on the Tutor LMS dashboard → Settings → Profile page, under Additional Information (and Instructor Details for approved/pending instructors).
For LMS managers (Tutor admin)
When editing a user in Tutor’s backend user management, custom fields appear in the user profile metabox under Custom Student Fields and Custom Instructor Fields.
For WordPress admins
Fields also appear on Users → Profile and Users → Edit User under Custom Registration Fields.
Optional: Display a Field in a Custom Theme Template
If you build a custom profile or report template, read values with standard WordPress user meta:
<?php

$user_id = get_current_user_id(); // or a specific user ID

$phone_number = get_user_meta( $user_id, 'phone_number', true );

if ( $phone_number ) {

echo esc_html( $phone_number );

}

?>
Use the meta key you set in Registration Fields (e.g. phone_number), not the label.
Confirm Your Registration Pages (Troubleshooting)
Find which page is the registration form
- Go to Tutor LMS → Tools.
- Open the Tutor Pages tab.
- Note the pages assigned to Student Registration and Instructor Registration.
Set or change the student registration page
- Go to Tutor LMS → Settings.
- Open the Advanced tab.
- Choose the page under Student Registration Page (and instructor page if needed).
- Click Save Changes.
Tips and Common Questions
Different fields for students vs instructors?
Yes. Use the two tabs on Registration Fields—they are completely separate.
Make a field required?
Turn on the Required toggle before saving. The browser will block submission until the field is filled.
Fields not showing in the Tutor dashboard?
- Student fields: shown for all users with configured student fields.
- Instructor fields: shown only for users with Tutor instructor status (
approvedorpending).
Upgrading from an older plugin version?
Existing field labels and meta keys migrate automatically. You gain type, required, and placeholder options without losing data.
Works with Tutor LMS Pro?
Yes—free and Pro are both supported.